Showing posts with label art. Show all posts

Monday, December 1, 2014

DIY Crafting: Mini Holiday Note Cards

Ready for the holidays? I've been ready since the Summer! I really love Christmas and the idea of gift giving.

During the Thanksgiving break, I decided to work on a quick set of mini holiday note cards. I have a tradition every year of giving out handmade cards to my penpals and friends.

Materials: Specialty card stock paper (I used a color palette of gold, silver, and white. Any card stock will do though.). 2 scallop-edged hole punchers (2 different sizes), 1 heart hole puncher, 1 mini double rectangle hole puncher, red ribbon, and a bone folder.  


I decided on a set of 8 note cards. I first hole punched all the pieces I would need for assemblage:
16 scallop-edged shapes (8 small/8 large), and 8 hearts. I also hand cut 8 note cards at 3x4.5 inches each and folded them in half.  

 Then I used the double rectangle hole puncher on the small scallop-edged shapes. I looped the red ribbon through these holes and tied it once into a bow. If you tie it twice, it will be more difficult to hot glue the heart on top of the ribbon. Tying the ribbon once will keep the bow loose and flat on the paper.

Next, I hot glued the hearts onto the ribbons. I used PVA glue to attach the small scalloped shapes to the large scalloped shapes, then affixed the completed pieces to the note cards. I let them dry under a heavy object to keep the paper flat. 

Here is the end result! Aren't they adorable? Perfect to tuck into a small gift or Christmas stocking.

I hope you're all doing well! Cheers!

Monday, October 27, 2014

The Mini Weaving Loom


On my hunt for a new craft to experiment with, I stumbled upon Beckarahn's handmade shop on Etsy. This shop is filled with miniature handmade weaving items. As soon as I spotted the mini weaving loom, I knew I had to have it. It was my first time using one, and I felt it a good introduction to weaving on a smaller scale.


With the purchase came a small loom, needle, beater comb, and instructions. The instructions were easy to follow and after creating a few, I quickly got the hang of it.


As you can see, I got a little carried away. They're so attractive to look at, I couldn't help myself.


I experimented with different kinds of yarn (bulky yarns don't work well for this, thinner yarns however, are great!). The size is ideal for creating coasters, or sewing the weaved squares together to make some kind of patterned blanket. There are endless possibilities with these little creations. It makes a great gift for a child too! 

I also think the process of weaving is meditative; a stress reliever to busy the brain when things get too tough. There's always something therapeutic in repetitive movement, don't you think so? 

Happy crafting.


Monday, October 13, 2014

Soft Doll Needle Wallets

Materials used:
- Fabric (quilt fabric, denim, home decor, to name a few)
- Felt
- Embroidery Floss
- Buttons

I created these cute little guys some time ago. It was my first time experimenting with a wallet type format, so there was a lot of trial and error. I wanted to create a small wallet where I could store needles, pins, a small pair of scissors, and even a little loop of thread.

The final size of these wallets came to be 3.5x4 inches (7 inches wide when opened). I created a 4x7 inch rectangular pattern (I like to use Bristol paper for my patterns. I find thin paper difficult to use, especially when they get flimsy when I try to trace with them). These are primarily soft covered wallets.


Each doll wallet has four felt pages for attaching pins and needles. I also added pockets to store other smaller materials and tools. The pockets were tricky to sew on the machine, especially since I had to align the bottom of the wallet with the top of the pocket.

I hand sewed each face, which was a lot of fun. I used a book called Stitch Sampler by Lucinda Ganderton (book has been added to the Book Resource tab on this blog) to experiment with different hand stitches. I think the faces came out pretty cute!

I now have a box full of wallets that I made, but I'm not quite sure what to do with them. They were originally made for a craft show, but I was unable to attend the event. I feel it odd to add them to my shop since I primarily sell handmade books.

If anyone would like one, I'd be willing to trade or sell them. Maybe I can even do a giveaway!

On that note, happy crafting!

Monday, October 6, 2014

Narrow Oriental Coptic Stitch Book - Part 1

Part 1 - Hard Book Covers

 Materials used for hard book covers:                                     Tools used:

- Specialty black paper with gold & silver accents                 - PVA glue (LINECO brand)
- Specialty solid gold paper                                                - Scissors
- Kraft card stock                                                              - Bone folder
- Beige book cover cloth                                                     - Wide paint brush
- Clear vinyl                                                                    - Crop-A-Dile Hole Punch Tool

I use kraft card stock as the base for all my book covers, so they're always cut the actual size the cover will end up being (in this case, 3.5x8 inches). The black specialty paper and book cloth were cut a half inch wider on all sides (2 cut pieces of each material).  


Afterwards, I placed each specialty paper & book cloth cut pieces on kraft paper using a light coating of PVA glue with my wide brush. Then I cut the corners and folded the excess over, gluing them to the card stock. The glued pieces tend to curl, so I placed them under a heavy object, allowing them to dry flat. (It's optional to use a bone folder to help lay the paper flat on the card stock). 

As they dried, I then cut 2 pieces of clear vinyl a half inch wider on all sides than the actual cover size.

I added an extra gold piece at the top of the book covers for design purposes. 

Once the pieces dried, I attached vinyl only on the specialty paper side (outside cover). Then the book cloth pieces got attached to the backs using glue (inside cover). Once attached, I allowed these to dry under a heavy object.

 
After drying, I took each cover to my Crop-A-Dile punch tool to create holes where the thread will loop through. I decided not to add eyelets, so the holes will stay naked.

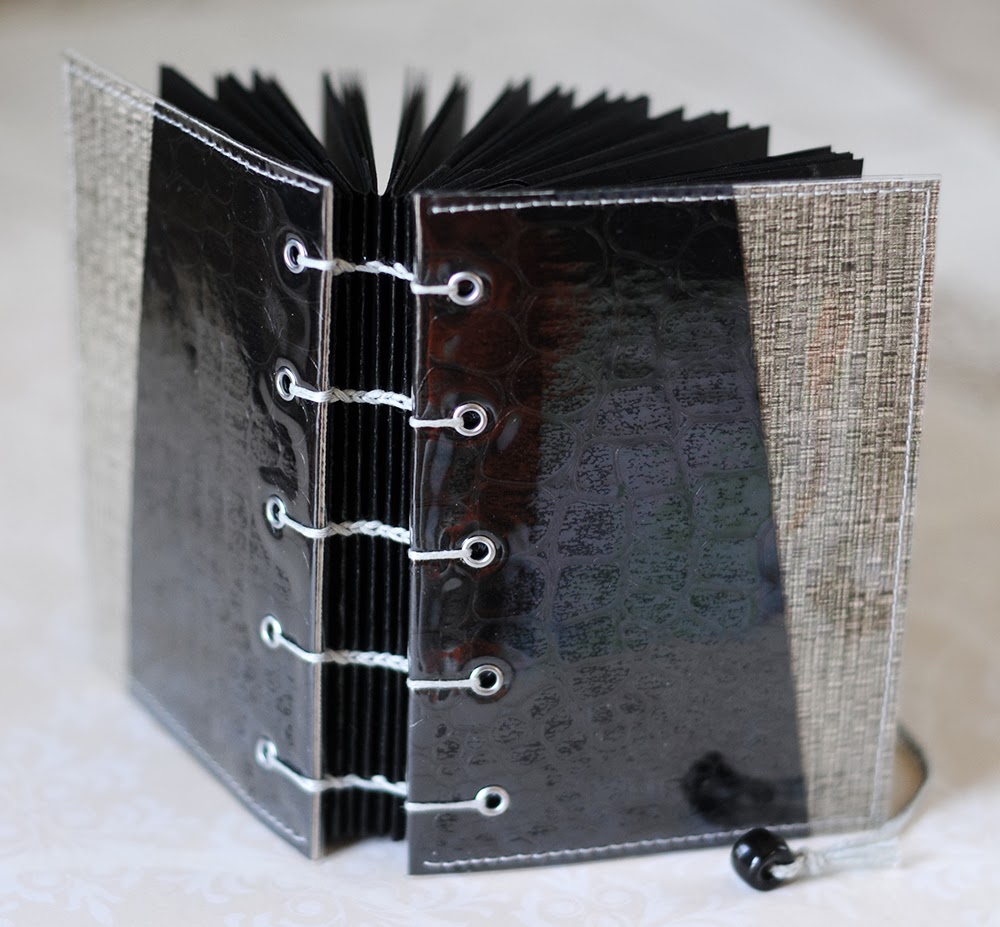
Here is the final result.


Outside and inside of the covers.

Throughout this coming week, I hope to work on the spine and pages next. Until then, happy crafting! 


Friday, June 13, 2014

Bookbinding - Coptic Stitch Silver Spine Book

 
On my recent quest for specialty paper, I went to NYC Art Central to get some book cover ideas. I found this lovely green paper made in Nepal. Once it reached its new home, I went to work in creating a new book cover.

Materials used: Specialty Nepal paper, silver textured card stock, craft paper, tan drawing paper, brown book cloth, vinyl, silver plated eyelets, brown thread, and beeswax. 

A typical book of mine usually has 9 signatures (4 sheets per signature). If I decide to add a folder, than the number of actual signatures decreases to 8. I use the left over thread from sewing the signatures together to create a book closure.    

The book cover is 3x4 1/4 inches. I purposely made the pages 1/4 inches smaller since the sewn signatures + the silver card stock takes up extra space. The silver card stock acts as a design element to the spine, as well as creates a separate distinction between signatures.

I decided to create a page template for this book. Taking some inspiration from the Nepal paper, I thought some organic lines would be much more fun than straight ones. I typically use Adobe Illustrator for my template needs.

 The backs and fronts of each book cover are created separately, than combined to create a hard cover. The backs are lined in book cloth while the fronts are covered in specialty paper and vinyl. Each cover uses brown craft paper as a base. 
 
This book has a total of 128 pages (counting both sides of each sheet). Its pocket sized; perfect for travel! Half the book has acid free tan lined pages, half blank pages, and a small brown folder. You definitely can't go wrong with a cute book like this!

Saturday, March 8, 2014

In Walks the Pink Lady Mini Book


I decided to create another small coptic stitch book with half lined pages, half blank pages, and a mini folder. I discovered this lovely metallic deep pink paper at a craft store nearby. I had to use it! 

I hand cut the pages and sewed them together with bees waxed thread. Usually I have all the papers cut and punched before sewing, but the folder I did right when I was ready to close up the book.

I use Adobe Illustrator to create book page templates. This is a simple lined one, with college ruled lines.


 I went through a couple of template options before I came up with one I was satisfied with. Sewing folders into books is actually pretty tricky because the folder flaps get in the way. Instead of having one long flap (which would have to remain unglued and sewed around), I decided to keep the flaps separated from each other (this way, they would be glued beforehand and I could sew through it like a regular signature). Made for easier sewing! 


For small (4.25x3 inches) books, I typically use 9 signatures, so that the end of the thread in the first signature is at the bottom of the page, and the braided bookmark connected to the last signature is at the top of the page.


Once its completed, I let the book sit under a heavy object for about a day to flatten it down.
 With that said, how did this book get its name?

My mother walked in on me finishing this book and said, "Oooh look, its the Pink Lady!" and the name stuck :). I think its a wonderful addition to the growing collection of books I've created. Doesn't it remind you of the coming of spring?

-Piki

Monday, February 24, 2014

New Coptic Stitch Books

https://www.etsy.com/listing/180447836/business-woman-soft-cover-coptic-stitch?ref=shop_home_active_7

I have finally recovered from being extremely sick (body weakness, pains, coughing, you name it, I had it)! Well, I still have a bit of a sore throat, but I became well enough over the weekend to work on some new books! Meet the Business Woman. Isn't she lovely? She has a very straight spine. Who doesn't love a woman with good posture?

https://www.etsy.com/listing/180447836/business-woman-soft-cover-coptic-stitch?ref=shop_home_active_7

This coptic stitch bound book is 4.25x3 inches (6 inches wide when opened). She has 144 blank tan pages and lies flat when opened! I really like the braided cord that acts as a book closure. You can also use it as a bookmark to mark your place!

https://www.etsy.com/listing/180452429/business-man-soft-cover-coptic-stitch?ref=shop_home_active_5

This lovely lady needed a companion, so I made the Business Man. I've been itching to use black paper, and I got my chance here. He also has 144 hand cut black pages, and is the same size as his partner. Color pencils and special inks work really well on this guy!

https://www.etsy.com/listing/180452429/business-man-soft-cover-coptic-stitch?ref=shop_home_active_5

They are both listed in the shop. You can click on the pictures to read the listings.

They're both perfect traveling buddies for you to pick up! Don't you think?

- Piki

Thursday, January 30, 2014

WIP: Bookbinding Book Covers


I've been feeling sick this past week, so I took off from work today and decided to get some bookbinding done. I focused on creating some fun book covers for some new books! I love mix & matching papers. I found this textured pebble paper at a craft store that's closing down soon; such a shame :(. At least I got the paper at a great discount!

I love doing illustration and typography, and I haven't been able to incorporate that into my books yet...until now! I decided to have a little color pencil fun. 

I also finished up another book I had been working on over the weekend. 

And here's the result! Any fun projects you're working on?

-Piki